A malfunctioning light switch can be frustrating and even alarming, especially when it disrupts the comfort and functionality of your home. Fixing a light switch that won’t work may seem daunting at first, but with the right approach and a clear understanding of potential issues, it can become a manageable DIY task. This guide will walk you through diagnosing and addressing the common causes of a faulty light switch, ensuring you can restore your lighting safely and effectively.
Understanding Why a Light Switch Stops Working
Before attempting any repair, it’s crucial to understand why a light switch might stop functioning. The issue could stem from various sources, ranging from a tripped circuit breaker to worn-out internal components. Sometimes, a loose connection or faulty wiring is the culprit, while in other cases, the switch itself may have reached the end of its lifespan. Knowing the possible reasons behind the problem helps you take the right steps toward fixing a light switch that won’t work.
Ensuring Safety Before You Begin
Safety must be your top priority when working with electricity. Always start by turning off the power to the circuit at your home’s electrical panel. Test the switch to confirm that there is no power running through it by flipping it on and off or using a voltage tester. This precaution ensures you avoid accidental electric shocks and can work on fixing a light switch that won’t work with confidence.
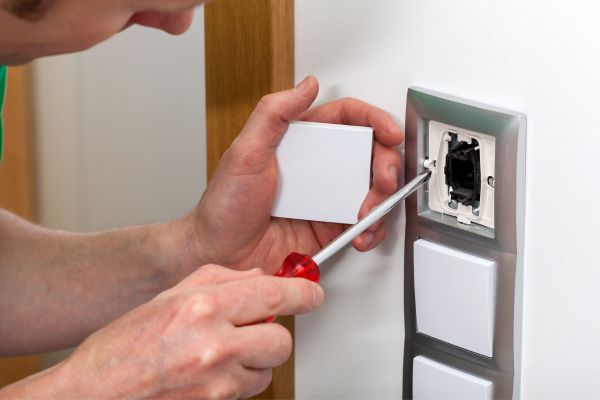
Diagnosing the Problem with the Light Switch
Once the power is off, remove the switch cover plate and inspect the wiring. Look for any loose wires, signs of burning, or corrosion. Sometimes, the issue is as simple as a loose wire that needs tightening. However, if the wires appear intact and properly connected, the problem may lie within the switch mechanism itself. In such cases, replacing the switch is often the most effective solution.
Replacing a Faulty Light Switch
If you determine that the light switch is defective, installing a new one is a straightforward process. After removing the old switch, take note of how the wires are connected. Connect the wires to the new switch in the same configuration, ensuring that each one is secured tightly under its terminal screw. Carefully tuck the wires back into the electrical box, reattach the switch to the box, and replace the cover plate. Once everything is in place, restore power at the electrical panel and test the switch.
When the Issue Is Beyond the Switch
There are times when fixing a light switch that won’t work involves more than just replacing the switch itself. If a new switch does not resolve the problem, the fault may lie elsewhere in the circuit. For instance, the light fixture could have a blown bulb or internal wiring problems. Alternatively, there might be an issue with the circuit breaker or a tripped GFCI outlet affecting the power supply to the switch. In such situations, it’s wise to consult a licensed electrician to investigate further.
Preventing Future Light Switch Problems
Regular maintenance and prompt attention to electrical issues can prevent future malfunctions. Avoid forcing a light switch when it feels stiff or unresponsive, as this could damage the internal components. Additionally, keep an eye on any flickering lights or buzzing sounds, as these may indicate an underlying wiring issue that needs professional attention. By being proactive, you reduce the likelihood of facing another non-functioning light switch in the future.
Final Thoughts on Fixing a Light Switch That Won’t Work
Fixing a light switch that won’t work is a practical skill that can save you time and the cost of hiring a professional for a simple repair. While the process is generally straightforward, always prioritize safety and know when it’s best to call in an expert. With careful attention to detail and a methodical approach, you can confidently restore functionality to your home’s lighting and enjoy the satisfaction of resolving the issue yourself.